We’ve said it lots of times before, but you really do get much more than just a printer in a box when you buy a Roland DG printer or print & cut machine.
Of course you get the printer, but you also get the fully comprehensive 1yr RolandCare warranty package, which covers everything including the printheads and even gives you guaranteed on site response times should you need an engineer. Then there is the amazingly powerful yet easy to use Roland VersaWorks or VersaWorks Dual RIP software, tailor-made to run the Roland DG printers and includes free updates – saving you on-going costs for upgrading.
For me however, one of the most valuable and often overlooked parts of the package is the complimentary Roland DG Academy course. The Intermediate Digital print course covers a whole host of topics including printer set up, colour management, media profiles and a huge amount more. We always get great feedback from delegates who find the sessions invaluable and really appreciate the tips that help them get the best from their investment straight out of the box.
So with this in mind, I thought I’d share 5 tips that will help you produce not just good results, but great results from your Roland DG printer.
1: Condition the media
It is important to give your media chance to acclimatise before you put it on your printer. This is to allow the media to more gradually come up to printing temperature, rather than be put straight on to the 40 degree print heater once taken out of storage. If you have kept your media in a cold container, shed or garage for example and overnight the temperature has gone down to 4 or 5 degrees, to then put it straight on to your printer and hit print can give some inconsistencies in the print as the pores of the media may not have opened up properly and it won’t accept the ink as well. In an ideal world, keep the media in the same room as your printer and give it chance to warm up before hitting print.
2: Correct media profile
Roland users are lucky in that there are literally hundreds of Roland VersaWorks profiles available to download free of charge from one our websites such as www.rolanddg.com, www.rolandprofilecenter.com or www.rolandprofilecenter.eu.

Choosing the right profile for your media not only ensures that you get the best quality output and the correct colours, but it also optimises the heater and more importantly ink usage settings so you use the least amount of ink to get the print done.
3: Bi-directional adjustment
A bi-directional adjustment ensures that droplets of ink fall in the correct place whether the printhead is travelling left to right or right to left.
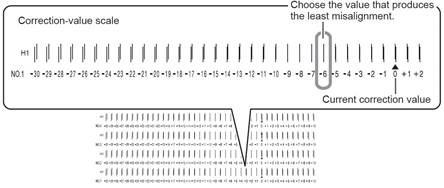
Ever noticed that a straight line is very slightly zig-zagged or small text is very slightly blurred? Chances are this is because your bi-directional alignment could be improved to sharpen up those images.
4: Feed calibration adjustment
This is vital when you are switching between different types of media. A banner for example is usually much thicker than a self-adhesive vinyl and as a result will sit closer to the print head. This means that in order for your print passes to join up correctly you need to compensate for this.
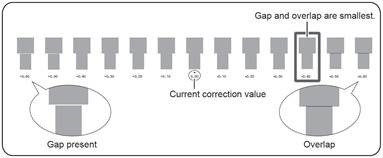
Think of it as the media passing over a curved surface - the face of a thicker media will travel further with the same mechanical movement due to the increased circumference so you can get a banding effect in your print (either a little black line where the passes over lap or a little white line where they don’t join up). This is not banding and there is nothing wrong with your printer – you just need to adjust your feed calibration.
5: Clean your printer!
To be honest there really is very little you need to do to keep your Roland DG printer in tip top condition. As a result of the latest generation Roland EcoSol Max inks being carefully produced in harmony with the printers, Roland users are recommended to do a manual clean only once per week. There is no regular flushing involved and all you need to do is follow your maintenance routine – clean around the outside of the print heads, clean over your wiper blades and make sure they are still supple and if ink is building up around the cap tops then give them a little clean too. It takes only 5 minutes but it can make a big difference.
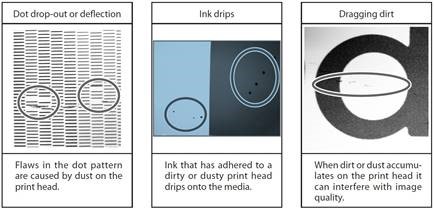
Ever noticed a little drop of ink in your prints where ink has built up on a hair stuck to the print heads? Keep your printer clean and you will end up with less little imperfections.
If you need more advice on keeping your Roland printer clean, keep your eyes peeled for our tutorial videos that make an appearance on our Roland DG YouTube channel.
So there you go… Some simple but effective little tips that I hope you find useful and don’t forget if you want to pick up some more advice, look no further than the Roland DG Academy.